
Importing Measured Field Strength Values
Q: How can I use TAP to view measured field strength data?
A: With TAP6.0.2175 or later and a Maintenance Subscription date of June 30, 2007, or later, you can import measured field data from several file formats.
Note that all values in this example are for demonstration purposes only. You should determine appropriate settings for your application.
When the values are imported, they create a new Task, just as a coverage study created with HDCoverage. That Task can be used like any other coverage study in TAP for displaying a coverage map in HDMapper, as well as other functions.
The latitude and longitude values for the measured points can be used to create an area coverage study of those locations as Target Points. Computing the values at those locations gives you a convenient way of comparing the predicted and measured values at those locations. By using those comparisons with different propagation parameters you can select the settings that best model your type of application and environment for future studies.
Before attempting to use the import function, be sure the file you want to use is in the correct format. You should make a copy of the measured data file to use with the TAP import function. The file may need to be edited for use with TAP, and making a copy to edit preserves the format in the original file for use with other software.
The import function can read Excel (.XLS) or comma-delimited ASCII (.CSV) files, or dBaseIV (.DBF) files.
For example, suppose you have a comma-delimited ASCII text file, MeasField.Txt. The ASCII data can be viewed in NotePad, WordPad or other basic text editor:
This sample file consists of three columns, the longitude of each point of a drive test measurement, the latitude of each point, and the measured input power in dBm.
· Longitude values must be decimal degrees, negative for western longitude, positive for eastern longitudes.
· Latitude values must be decimal degrees, positive for northern latitude, negative for southern latitude
· Be sure you know the units used to record the measured values. As described below, the values will be converted to dBu (dB above one microvolt per meter of field strength, also written as dBuV/m). If the recorded values are a voltage (such as uV or dBuV) or power (such as mW, or dBm) or other units you will need to know other parameters, such as the frequency, receiver antenna gain, and input impedance in order to convert the values to dBu of field strength.
In order to read and edit the text file in Excel, add column headers, separated by commas as shown:

· RDB_LON is the required header name for the longitude
· RDB_LAT is the required header name for the latitude
· In this example, MEAS_DBM is a user-selected header name for use in Excel. As explained below, the final file to import will have a column header of RDB_VAL for the field strength values in dBu. If the measured values are already in units of field strength (dBu), use the column header RDB_VAL.
Use the Edit|SaveAs function to save the file with a .CSV file extent (you could also save the file and rename it in Windows Explorer. Using the SaveAs function preserves the original file and format as suggested above.

When the file has been saved with the .CSV file extent, close the ASCII editor and open the file in Excel:

If the measured values are already in units of field strength, and you have already named the column RDB_VAL as described above, it is not necessary to convert to field strength units and you can save and close the file:
If you need to convert the measured values to units of field strength (dBu), right click the top of the measured value column and use the Insert menu to insert a new column:

When the new column is inserted, enter a header of RDB_VAL:

Now the input power values actually measured in the drive test (in the MEAS_DBM column) must be converted to field strength values (in dBu) for the RDB_VAL column. The Field Intensity Units article provides several conversion methods for converting input power and voltage values to field strength.
This example describes converting from measured values of input power in dBm for a specific frequency and antenna gain. You must determine the appropriate values to use for your measured data. If the measured values are in other units you will need to select the appropriate conversion formula.
In this example, the input power in dBm can be converted to the equivalent field strength value using the equation from Equation 9 from the Field Intensity Units article:
PdBm = Edbu + GrdBi – 20LOGFMHz – 77.2
Where:
P is power in dBm
E is field in dBu
Gr is receiver antenna gain in dBi
F is the frequency in MHz
Solving for E:
Edbu =PdBm – GrdBi + 20LOGFMHz + 77.2
If the antenna for the measuring receiver was a 0dBd (2.15dBi) antenna, at a frequency of 455MHz, then the equation reduces to:
Edbu =PdBm – 2.15 + 20LOG(455) + 77.2
Edbu =PdBm – 2.15 + 53.16 + 77.2
Edbu =PdBm + 128.21
This equation can be used to create the RDB_VAL column in the Excel file. Select the first cell in the empty RDB_VAL column:

Enter the desired equation in the cell, beginning with the equal sign:

The “D:D” represents the value in each cell of column D, the MEAS_DBM column.
Move the cursor off the cell where you entered the formula. The computed result for that cell is displayed:

Move the cursor back to the cell, and double-click the cell fill handle, the small square at the lower right corner of the cell.

Double-clicking the fill handle will fill the rest of the cells in that column using the same formula:

Save the file and close Excel.
When you have the file in the correct format, you can use the import function to read the data. The import function is available from two menu items:
· “Import Measured Coverage” under the Area menu:

· “Import Measured Coverage” under the Editors|Import menu:

A confirmation message will be displayed:

Click Yes to continue with the import process. Click No to abandon the function.
A new Task ID will be assigned, and you will be prompted to enter a description for the Task:

Enter a description that will help you select the Task in the future:

Click OK to continue the import process.
It may take several seconds to set up the Task. You will then be prompted for the transmitter site used for the measured data. The site can be entered as any other Fixed Facility record:

The only required information is a site description and the coordinates. Other information (site elevation, antenna heights, frequency, power, etc.), will be needed if you use the site for other purposes in TAP. It is recommended that you enter all available facility parameters to help document the measured values.
When you have selected the site you want (or entered and saved a new site) click the Continue button.
You will be prompted for the file to import.

Use the Browse (“…”) button to find the file you want to read:
Select the file you want to use and click Open:

When you have selected the desired file, click the Import button:

The number of records imported will be displayed near the lower left corner of the form.

When the import is complete, click the “X” in the upper right corner to close the form:

The imported data will be used to create a shapefile of the coverage:

The imported measured data will be displayed in HDMapper:

Since no field levels have been set, you will want to set the level or levels you want to display. Double-Click the legend entry for the layer to display the Layer form:

The Layer form enables you to set the values you want to display for the measured field data (the same way you set desired levels for computed field data in TAP).

For example, if the value of 30dBu is a specification for your project you can enter that value, as well as a description:

Click Continue to apply this setting to the layer on the map:

You can also use the Layers form to set other levels you want to display:

For drive-route measurements, it may be helpful to add detailed street-level shapefiles (for information, contact SoftWright).

You can also use the measurement locations to create a coverage study in HDCoverage, using the Target Point function. This will enable you to compute the predicted field strength at each location and compare the computed and measured values.
In HDCoverage, create a new study with the measured data transmitter site for the Fixed Facility record:

Remember you must have power, frequency, antenna parameters, and other data completed in the Fixed Facility record to actually use the record in a computed coverage study.
You must also select or create a Mobile Facility record comparable to the measurement receiver used if you want to compare the computed and measured results.
For the Coverage Area, select the Target Study type:
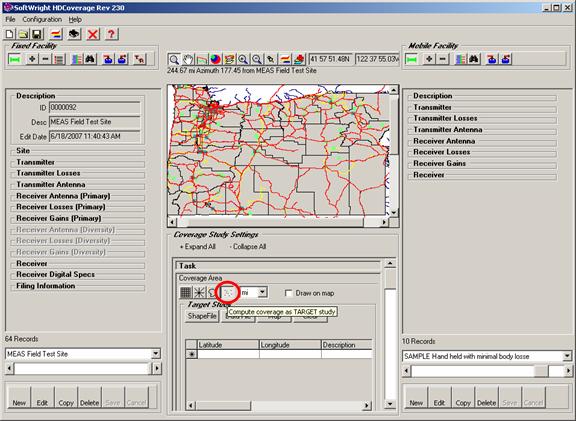
To read the measurement locations from the shapefile created by the import function, click the File button:

Select the shapefile created by the import function. The file will have the name corresponding to the Task description you entered at the beginning of the import process:

The FM RAN attached to the default file name represents Field Measurements, Random locations (rather than Tile or Radial locations used in computed field studies).
The data columns in the shapefile database are displayed. Select the DBU_FIELD item to be used in the Target Point descriptions:

Since this function can be used with other shapefiles, other database values may be useful. For example, if you were using a shapefile of well locations, the shapefile might include a column (or database “field”) for the well ID number that would be useful for the target description.
Click the Continue button. The coordinates for each measured location are added to the Target Point list:

That study can now be run as any other TAP coverage study to determine the computed field strength at each of the measured locations.
|
|
Copyright 2007 by SoftWright LLC