

Adding TAP Multi-Seat Users
Q: How do I add users to my TAP6 Multi-Seat license?
A: With TAP6.0.2363 or later and a Maintenance Subscription date of September 30, 2010, or later, you can purchase a TAP license configured for either single-seat or multi-seat operation. The number of "seats" defines how many concurrent users can be running instances of TAP. Any number of users can be added (as described below), but only the number of licensed seats can be operating at the same time.
Note that all values in this example are for demonstration purposes only. You should determine appropriate settings for your application.
Initial Installation
The TAP software must first be installed on the server from one of the workstations. If you are installing the software on the same machine where a previous version of TAP (licensed or demo) was installed, be sure to install the new software into the same folder where the old software is located. Multiple installations of TAP on the same machine (in different folders or even different drives) will cause confusion in the Windows Registry and unpredictable operation of the software.
Be sure your Windows user account has full Read-Write-Modify permissions on the folder where TAP is installed and the files and folders it contains. Also, those folders and files should NOT be marked Read-Only. You can find more details in an FAQ at:
http://www.softwright.com/faq/support/windows_permissions.html
Also, if you are using Win7, Vista, WinServer2008, or other operating systems that use Microsoft’s “Virtualstore”, check the Virtualstore feature to be sure none of the TAP components or other files are being installed in the Virtualstore folder. For more info, take a look at the FAQ at:
http://www.softwright.com/faq/support/tap6_win7.html#Virtualstore
After installing the software from one of the workstations you should verify the operation of the software. An FAQ that will be helpful in getting acquainted with the software is at http://www.softwright.com/faq/support/tap6_quicktour.html
There are short videos available that may help you become more familiar with the software.
For drawing path profiles:
http://softwright.com/video/swprofile1/swprofile1.html
For area coverage studies:
http://softwright.com/video/areacov1b/areacov1b.html
The addition of other users depends on whether your installation is a connection of a workstation to a local server or remote access via a Terminal Server connection to a Remote Desktop.
This section describes the installation and addition of users for a TAP system on a local server accessed from local workstations on the network.
After you have verified the operation of the software on the first workstation you are ready to install the additional workstations.
The location of the TAP installation must be mapped as a drive letter. For example, if you typically connect to the server with a connection such as \\servername\appfolder$ you must map that location with a drive letter, such as "T:\" For example, in Windows XP, from My Network Places, select the server and click the Tools-Map Network Drive menu. Then select the desired drive letter and the folder where TAP is to be installed, such as "T:\SWTAP"
Map the same server location and drive letter on each workstation where you want to access the TAP installation on the server. Then from each workstation use the TAP Software Setup disk to install the software to that mapped drive letter and into the same folder. This will ensure that the necessary Windows Registry entries are made on the workstation.
When you install the software from additional workstations it is only necessary to install from the Software Setup disk. If you received additional disks (Setup Assistant, Topo Data, Shapefiles, Land Use files, etc.) it is not necessary to install these disks from additional workstations, only the first workstation.
When the setup is complete on each workstation, click the "UPDATE installation" option on the form that is displayed.

This section describes the installation and addition of users for a TAP system on a remote server accessed using the Terminal Services for the Remote Desktop.
The TAP software must first be installed on the server by one of the remote users. Then additional users can be added to share that TAP installation.
For example, suppose there are two engineers who want to use the TAP software with the Windows user names smith and jones.
The user smith can install the TAP software from his account on the server. It is strongly suggested that the first user ensure that the software is operating successfully on that account before attempting to add other users.
Be sure the Windows user account has full Read-Write-Modify permissions on the folder where TAP is installed and the files and folders it contains. Also, those folders and files should NOT be marked Read-Only. You can find more details in the Windows Permissions article.
Even if the account has Administrator privileges, be sure the user account (not just the Administrator account) has those privileges.
Also, if the operating system is Vista or Windows7, check the Virtualstore feature to be sure none of the TAP components or other files are being installed in the Virtualstore folder. For more info, take a look at the Virtualstore section of the TAP6 and Windows 7 article.
Once the initial installation has been tested, the necessary files can be copied from the user profile of the initial installation to the user profile for any other user who needs access to TAP.
The utility program SWMultiSeatUser.exe can be used to copy the needed files. Double-click the SWMultiSeatUser.exe file in the folder where TAP is installed to launch the program. (If your TAP installation does not have the file, you can download it from the SoftWright web site. Unzip the downloaded file (SWMultiSeatUser.zip) to create the utility program file.)
When you run the utility, the form will display two User Profile paths, one for the existing user who has already installed the software (in this example, smith) and a second User Profile for the desired new user to be selected:
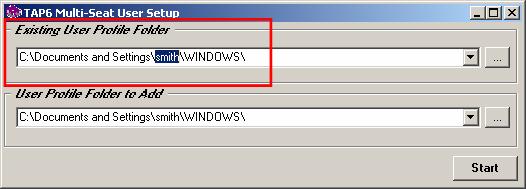
If the default setting for the existing user profile is not correct, use the “Browse” button (“…”) to navigate to the correct folder.
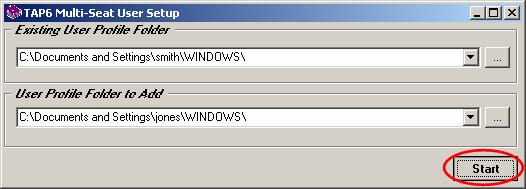
Then edit or navigate with the “…” button to the User Profile folder for the new TAP user to be added to the multi-seat operation, in this case, the user jones:
Click the Start button to copy the files:
Click OK to confirm the copy process:
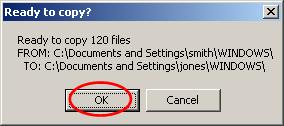
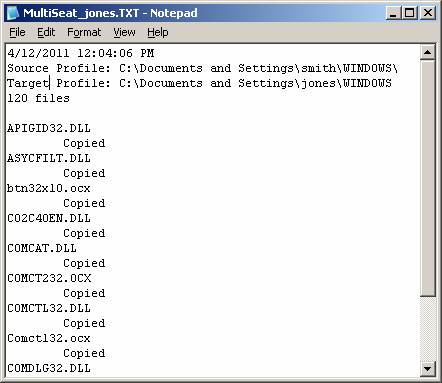
When the copy process is complete, a text file will be opened to confirm the successful copy to the new User Profile folder:
|
|
Copyright 2011 by SoftWright LLC