
Point Elevation Values
Q: How can I quickly find the elevation of several locations?
A: The Single Point Elevation function enables you to enter coordinate values and extract the elevation from the topographic data.
Note that all values in this example are for demonstration purposes only. You should determine appropriate settings for your application.
This article describes the function in TAP6.0.2173 or later and a Maintenance Subscription date of June 30, 2007, or later. Earlier versions use a similar function but the user-interface is different.
With TAP6.0.2423 or later and a Maintenance Subscription date of November 30, 2011, or later, you can use a text or comma-delimited file of coordinate locations to find the elevations of each location.
The function is launched from the “Map|Point Elevation” menu:
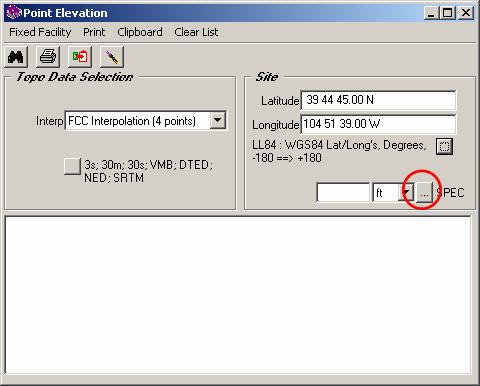
The Point Elevation form is displayed:

Use the pull-down list to select the interpolation method you want to use for the topographic data:

Use the Data Type button to select the types of topographic data you want to use:

The Topographid Data File Types form is displayed:

The program will search all the selected data types, in all the files you have included in the topographic data index, automatically selecting the best resolution data (the data with the closest spacing between points). Normally you would include all the data types. But you have the option of selecting only particular data types if you have special requirements.
You can enter coordinates manually:

Use the Lookup (“…”) button to set the coordinate datum:

For example, to specify WGS-84 coordinates, be sure the Group selected is “Latitude/Longitude (LL)”, and the Coordinate System is “LL84”

The coordinate system description will be displayed:

When the settings you want have been made, click the Lookup (“…”) to get the elevation of the point:
The elevation will be displayed, and the coordinates and other details are added to the list at the bottom of the form:

Instead of entering the coordinates manually, you can use the Fixed Facility Lookup button:

Select the facility record you want from the Fixed Facility Interface:

Click the Continue button to return the Facility information to the Point Elevation form:

(Click the Cancel button if you want to return to the Point Elevation form without returning the Facility information.)
When the coordinates are displayed, click the Lookup button to get the elevation for the new point:

The elevation will be displayed, and the details added to the list:

The Print List button (or the Print menu) enables you to print the list from the form:

The list will be displayed in a Notepad file that can be saved, printed, edited, etc.

The Copy List to Clipboard button (or the Clipboard menu) enables you to place the list on the Windows Clipboard. That list can then be pasted into other applications, typically using the Edit|Paste function:

The Clear List button (or menu) enables you to clear the entries from the list:

Clearing the list enables you to “start fresh” if you want to do certain calculations, then print or otherwise use the list information.

|
|
Copyright 2007 by SoftWright LLC