AutoCoverage Operation
Q: How can I run TAP coverage studies from an Excel spreadsheet or comma-delimited file?
A: The AutoCoverage module reads coverage parameter information from a spreadsheet or ASCII comma-delimited file and executes coverage studies.
Important Note: AutoCoverage is driven by the data you enter into the spreadsheet or ASCII file. Unlike HDCoverage the data entry for AutoCoverage does not contain detailed error checking, since the spreadsheet or ASCII file is created completely independent of TAP. As described below, AutoCoverage does include a validation function to check for invalid settings. Therefore, it is possible to enter valid information that is not what you intended (such as the wrong propagation model or some other setting).
In order for you to become familiar with AutoCoverage and the process of setting up and using the external files, it is strongly suggested you set up and run several sample studies. A good way to check your input files is to use several studies you have already run with the Area Coverage Setup function. If you create a spreadsheet or ASCII input file with the same parameters and run these studies with AutoCoverage the results should be the same. If the AutoCoverage results do not match the Area Coverage Setup results, some settings in the AutoCoverage input file have not been set correctly. Once you have duplicated the original results using AutoCoverage you probably have a good understanding of how to set up the input files. Then you can start setting up AutoCoverage input files for new studies. If you need help with the creation of the input files, please contact SoftWright support.
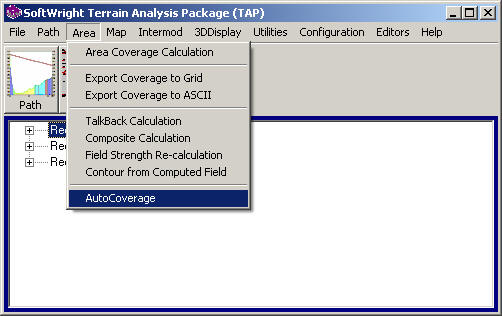
To run AutoCoverage from the TAP menu, click Area, then click AutoCoverage:
(As described below, you can also launch AutoCoverage from the Windows Run command, or from a DOS-style batch file in command line mode.)
The SoftWright AutoCoverage form will be displayed:
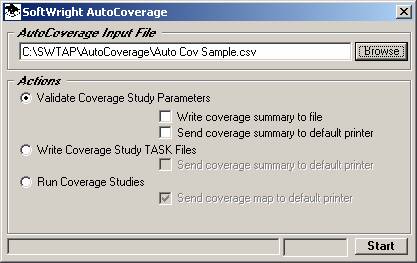
Input File
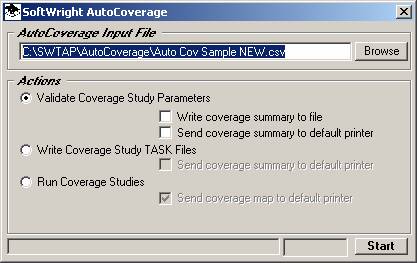
Use the Browse button to select the Excel (.XLS) or comma-delimited (.CSV) file you want to use.
You can create a new .CSV file if you enter a file name that does not exist.
You will be prompted to create the new file:
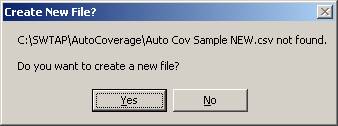
Creating a new file in this manner creates all of the AutoCoverage field names. You can open the .CSV file with Excel to add the parameter information in the appropriate fields.
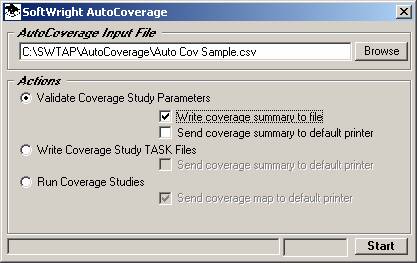
Actions
Select the action you want to perform by clicking the appropriate option button on the form:
Validate Coverage Study Parameters
This option just reads the input file and validates that each record (row) in the file (representing one coverage study) contains the necessary information to run the study.
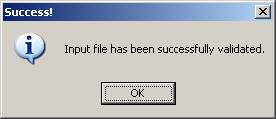
If the validation is successful, a message is displayed:
If any errors are encountered, a report is generated showing the errors:
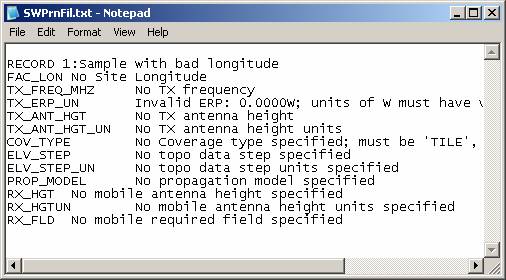
The validation report is designed to help you quickly find and correct the problems in the file.
The record number in the file, along with the Task Description is shown to define which record contains problem(s) that would prevent the study from running successfully:
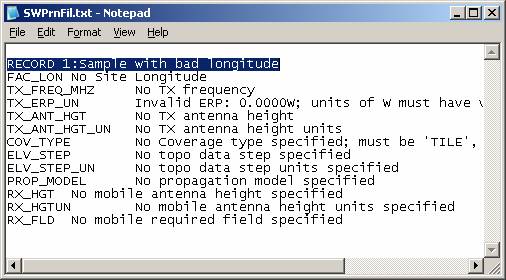
The Field (column) name is shown for each problem in the file:
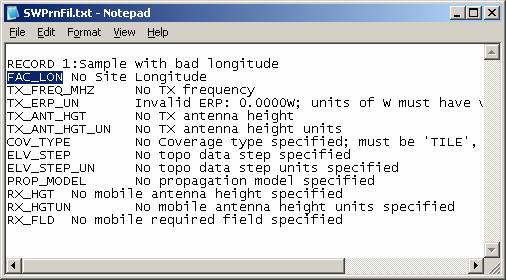
A brief description of the problem is shown:
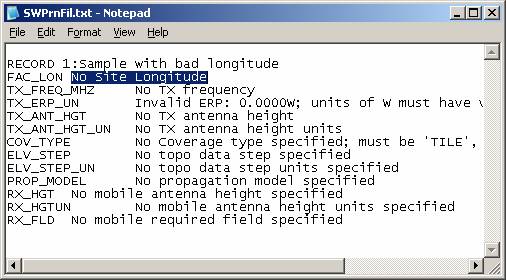
Running the validation action is a good way to be sure the input file contains no errors that would keep the studies in the file from running successfully. (Note that the validation action is always executed before writing the Task files or the coverage studies are run.)
You can select the option to write a summary of the study parameters by checking the box:
This option will write an ASCII text file for each study. The file name will be the input file name, with “_RECxxxx” appended, where xxxx is the record number in the file:
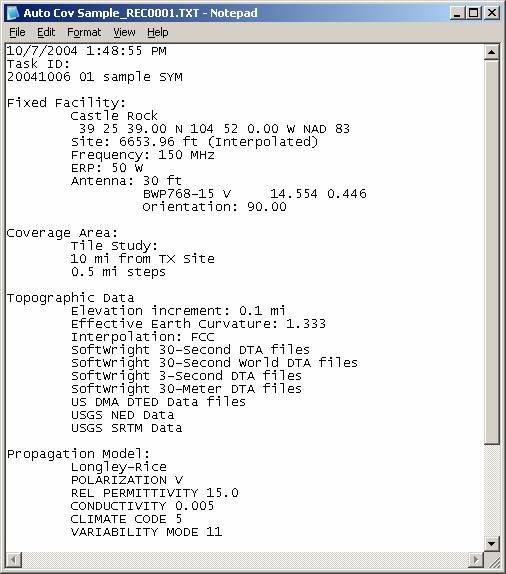
(Note that since the Task files were not written, no Task ID was assigned. The summary file can also be written when the Task files are created, as described below.)
The second option enables you to send the summary reports for each record in the input file to the default printer.
Write Coverage Study Task Files
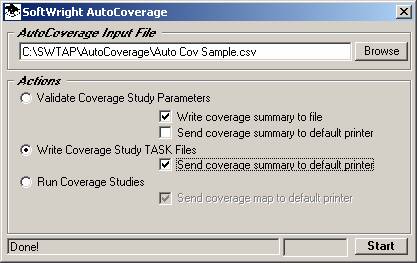
This option first runs the validation function, and when all coverage study records in the input file have been successfully validated, a Task ID is assigned for each one and the corresponding Task files are written. The Task files are the primary mechanism used by TAP for storing and retrieving parameters, results, and other information for the coverage studies.
When the Task files have been written, a report is displayed showing the Task ID assigned for each of the studies, along with the study description for each task.
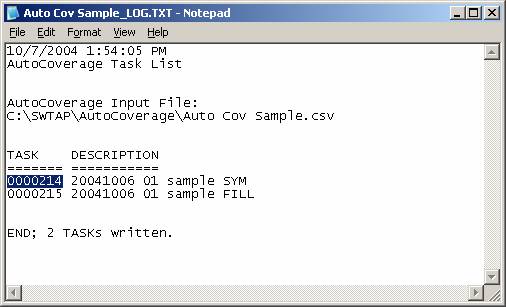
Note that every time you run the Write Coverage Study TASK Files function, new Task ID values are assigned. For example, if you run the function again for the same input file, new Tasks are created and new ID values are assigned:

This is important to remember, in order to avoid creating unnecessary Tasks with the same parameters. This Write Coverage Study TASK Files action is included in case you want to create the Task files to be later run manually from HDCoverage.
Run Coverage Studies
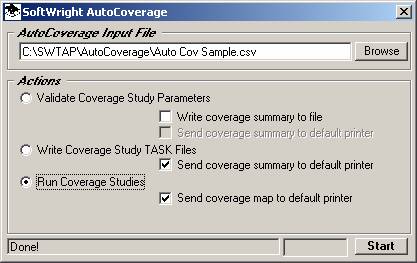
The Run Coverage Studies action first executes the validation function, then writes the Task files with new Task ID values, then executes all of the studies contained in the input file.
The option to “Send coverage map to default printer” enables you to automatically send the computed field strength study the TAP HDMapper program, plot the coverage and other shapefile information based on the HDMapper default settings and send the map to the default printer. The Task summary file (the text information describing the study parameters) is also sent to the printer if this option is selected.
Since this action uses the HDMapper default settings, you should first run a single study and draw the map in HDMapper to set the default settings as you want them to be printed. (You can still use the normal TAP functions to open a completed HDMapper file, or to plot a new map using the computed field strength information from any of the studies computed by AutoCoverage.)
Command Line Operation
AutoCoverage includes the ability to run the program with command line options.
The command line syntax is:
SWAutoCoverage /INP=inputfile /OPT=A /PRTMAP=M /PRTSUM=S /RUN=R
Where:
□ SWAutoCoverage is the name of the .exe file (you may need to include the path information if you are not running the command line from the folder where TAP is installed.
□ inputfile is the name (with the complete path information) of the .XLS or .CSV file containing the coverage study information.
□ A is the action you want to set on the form:
o 0 (zero) for Validate
o 1 for Write Task Files
o 2 for Run Coverage Studies
□ M is set to 1 if you want to mark the checkbox “Send coverage map to default printer”
□ S is set to 1 if you want to mark the checkbox “Send coverage summary to default printer”
□ R is set to 1 if you want to run the studies (equivalent to clicking the Start button on the form). If the /RUN=1 command line parameter is not included, the program will load the form and set the appropriate action and options, but will not start the action.
Multiple command lines can be included in a DOS-style batch (.BAT) file if you want to run AutoCoverage on multiple input files.
|
|
Copyright 2004 by SoftWright LLC