Q: How can I use SURFER to plot coverages I have computed in TAP?
A: SURFERÔ (from Golden Software) is a two- and three-dimensional plotting tool that can be used to show topography, field strength, or other data. The values can be drawn in two-dimensions (such as contour levels for elevations or field strength), or as a three dimensional plot. You can also combine topography and field strength information, for example, to draw a three-dimensional plot of the terrain, with an overlay of different colors for different field strength levels.
Terrain elevation information can be extracted from the topographic data base using TAP to create a grid file for SURFER as described in "Plotting Terrain in SURFER".
The method of transferring the computed field strength information into a form that can be used by SURFER depends on the type of coverage study that you want to use: Tile, Radial, or Contour. The type of study is determined when you set up the study using the TAP Area Coverage Setup form. You must set up and run the study before you can plot it in SURFER. You may want to plot the study in TAP first, before plotting in SURFER, to be sure the results are what you expected.
Tile Coverage
Since SURFER uses a uniform rectangular data arrangement (a SURFER "grid" or .GRD file) for plotting, the TAP Tile coverage study (calculation of field strength values over a uniform rectangular area) is the most direct way to get the values from TAP into SURFER.
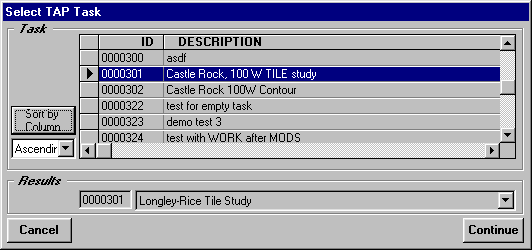
After the tile study is completed, go to the Coverage menu in TAP and select "Export Coverage to SURFER Grid". You will be prompted to select the coverage study you want to use.
Be sure to select a Tile study. If you select a Radial or Contour study, the program will display a warning that this type of study cannot be exported to a grid file. Exporting Radial and Contour studies is discussed below.
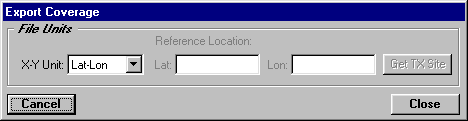
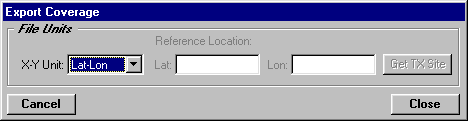
After you select the coverage, you will be prompted for the units to use in the file you export. You should generally select "Lat-Lon" units. (The other options are generally for compatibility with older versions of TAP.)
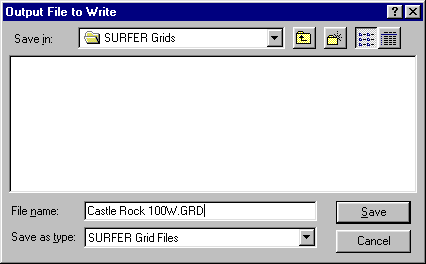
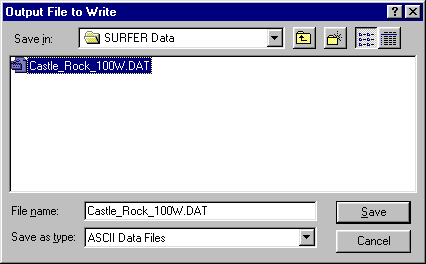
Finally, enter the file name to use when you save the file. This will be the file you will read later from SURFER:
When the file export is completed, you can read the grid into SURFER just as any other grid file.
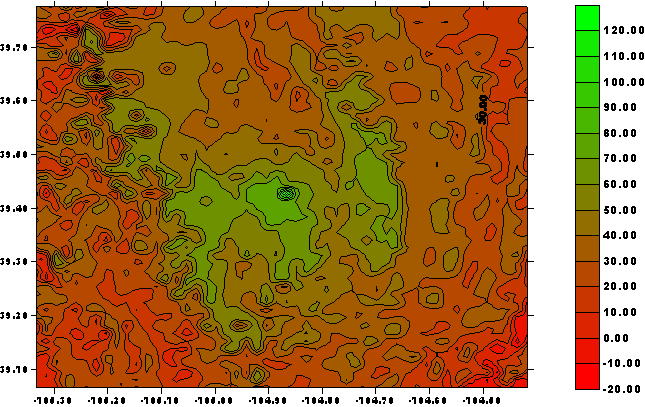
In SURFER, select the Map menu. Then select the type of drawing you want, either "Contour" for a two-dimensional map of the field strength, or "Surface" for a three-dimensional plot.
SURFER will prompt you for the grid file. Enter the file you created with the TAP Export function. You can set the levels to plot, colors for different levels, etc., as described in the SURFER manual.
You can also add boundary information (such as the .BNA files used with TAP) through the SURFER Map menu by selecting "Load Base Map" and choosing the boundary file. In SURFER, the two plots (the coverage information and the boundary information) are independent of each other. That is, they are not automatically registered, or aligned together. To align the maps together, first use the Edit menu to "Select All", then the Map menu to "Overlay Maps". You may need to use the "Edit Overlay" function to position the maps, such as bringing the boundary information to the front so it is visible over the coverage contours.
Radial Coverage
If the coverage study was computed as radials from the transmitter site, a different approach must be used, since SURFER ultimately needs the data in a grid format. In this case, TAP can export the radial field strength values to an ASCII file and the SURFER Grid function can be used to create the grid file. Note that this means the actual computed values from TAP will be interpolated by the Grid function in SURFER.
In the TAP Coverage menu, select "Export Coverage to ASCII File" and select a Radial coverage, much like the Tile coverage was selected before.
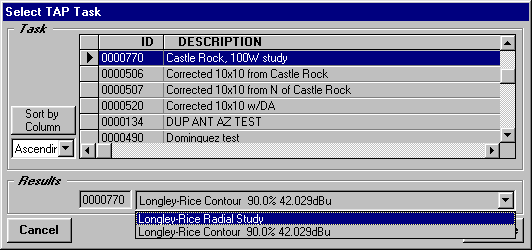
Note that some studies may contain both a Radial and a Contour study. (This happens when radial field strength values are computed and then the contour value is interpolated from those values for each radial.) If you want to export the Radial study, be sure that study is selected in the lower part of the form as shown.
As above, you should select "Lat-Lon" as the units for the file to write:
When you enter the file to write, remember that this will not be a grid file, but a data file. The default file extent SURFER expects for data files is .DAT, but any valid file extent can be used. (Note that some earlier versions of SURFER may not allow spaces in the file name, or path names longer than 64 characters.)
When the file export is completed, you can read the data into SURFER to create a grid file. In SURFER use the Grid menu and select Data, then find the file you created.
SURFER offers great flexibility in how the data is interpolated, i.e., how the values along the radials from the site are used to approximate the values on a uniform grid that SURFER can plot. You can simply accept the default grid parameters suggested by SURFER, or you can make changes based on the information provided in the SURFER documentation.
SURFER will create a grid file that you can plot using the Map menu and selecting "Contour" or "Surface" as described above, as well as adding boundary information under the Load Base Map option. As described above, you must use the "Overlay Maps" function to align the separate maps.
Contour Coverage
TAP contours coverage calculations provide a much simpler presentation of the field strength information, such as a single closed contour representing a constant value of field strength.
To export a TAP contour for use in SURFER, you can use the TAP Coverage menu and select "Export Coverage to BNA File". In this case, you will select the study as described above, and specify a file name (usually with a .BNA extent).
In SURFER you can use the Map menu and select "Load Base Map" to bring the .BNA file containing the contour into SURFER. You can use the same function to read other .BNA files (such as boundaries) then use the SURFER functions to change the properties (colors, line widths) of the different maps. As described above, you must use the "Overlay Maps" function to align the separate maps.
Copyright 2000 by SoftWright LLC