Selecting ZIP Codes with the Boundary Polygon Filter Program

Q: How can I get a list of ZIP codes contained in several contour areas (TV Grade B and 75-mile territories)?

A: In addition to using the graphical editing features of TAP (showing the ZIP codes on a map, using the various Grade B polygons to select them) you can use the Boundary Polygon Filter program. This program is more automated and will take less interaction (and therefore less time) from the user.

The process described below consists of two parts.

Building the Filter File

When TAP computes a coverage contour, the values are written to a dBase (.DBF) file for use with other TAP functions, other programs, etc. Since the Boundary Filters used in this article work with .BNA boundary files, the first step is to export the computed coverage contour(s) to .BNA files.

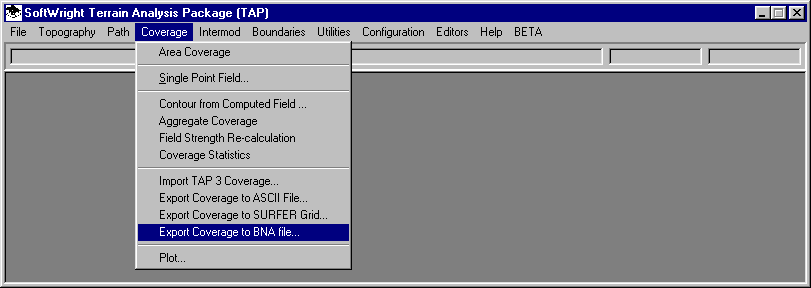
From the TAP Coverage menu, select "Export Coverage to BNA File":

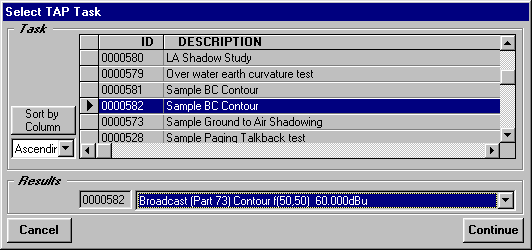
A list of available coverages will be displayed. Select the study and contour you want to use as a "filter" to select items within the contour:

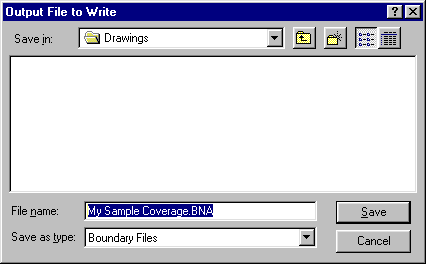
Then you will be prompted for the name of a .BNA file to write:

After the coverage contour has been saved as a .BNA file you can use it with the boundary file filter programs.

From the main TAP screen, click on the "Boundaries" menu. From the menu select the program "Filter by Distance".

This program will enable you to select all of the needed filter files (Grade B, etc.) and write them all to one new BNA file.

Click on the "Select" button in the "INPUT FILES" section (near the top of the form). From the dialog box that is displayed, select the Grade B and 75-mile contours you need. If there a several needed files in the same directory, you can multi-select them by holding down the CTRL key while you click on each one.

In the "Coordinates" part of the "FILTER" section (in the middle of the form), if you know the approximate latitude and longitude of the area you can enter them here, but if you do not know the latitude and longitude, it will not matter.

In the "Distance" part of the "FILTER" section (in the middle of the form), enter 20000 miles. This will force all of the Grade B and other contours to be included, no matter what coordinates you enter.

In the "FILTER" section (in the middle of the form), be sure that both the "Containing" and "Intersecting" boxes are checked.

In the "OUTPUT FILE" section (near the bottom of the form), enter the file name of the new BNA file you want to write. This file will contain all of the Grade B and other contours in the files you selected above in the "INPUT FILES" section. For example, if the files are all of the contours around Seattle, you could name the file, SEA_ALLB.BNA to indicate that all of the Grade B and related contours.

Click once on the "START" button on the form. This will start the process of reading all of the input files, checking them against the distance (20,000 miles in this case) and writing all of the objects within that distance to the new file.

When the file is complete click once on the "CLOSE" button on the form. You now have a BNA file containing all of the contours you want to find the ZIP codes in.

Making the ZIP Code File

Now, using the new file containing the boundaries that you just created, you can use those boundaries to filter out a list of all the ZIP codes they contain.

From the main TAP screen, click on the "Boundaries" menu. From the menu select the program "Filter by Polygon".

Click on the "Select" button in the "INPUT FILES" section (near the top of the form). From the dialog box that is displayed, select the state five-digit ZIP code files for any of the states in the area. The state ZIP code files are in the \BNA folder, with names like WA_ZIP5.BNA for Washington state, CO_ZIP5.BNA for Colorado, etc.

It is important to include any possible state that might be included in any of the Grade B or 75-mile boundaries. If you leave out a state, the ZIP codes in that state will not be included, even if they are in any of the boundaries.

In the "FILTER" section (in the middle of the form), enter the name of the BNA file you created with all of the Grade B and 75-mile contours to be used to select ZIP codes. You can use the "BROWSE" button to find the file.

In the "FILTER" section, be sure that both the "Containing" and "Intersecting" boxes are checked.

In the "OUTPUT FILE" section (near the bottom of the form), enter the file name of the new BNA file you want to write. This file will contain the ZIP codes contained in or intersected by all of the Grade B and other contours in the filter file. For example, for the filter file described above (all of the contours around Seattle), you could name the file, SEA_ALLZ.BNA to indicate the ZIP codes for all of the Grade B and related contours. Note that this file should have the .BNA file extent. The program will also create a separate text file (such as SEA_ALLZ.TXT) in the same folder containing the list of all the ZIP codes, just like the "EXPORT" function in the TAP Map Window Control form.

Click once on the "START" button on the form. This will start the process of reading all of the input files. The program will automatically display a map of the area and show the filter contours while it performs the filtering process. Normally, you should not attempt to make any entries or input to the program while this automated process continues.

When the file is complete the graphic map display will be removed. Click once on the "CLOSE" button on the form. You now have a BNA file containing all of the ZIP codes in the specified contours. If you want to draw a map showing the contours and the ZIP codes, you can use the normal "FILE|NEW MAP" menu and enter this new file along with the individual contour files

Copyright 1999 by SoftWright LLC