Cities Within a ZIP
Code
Q: Can I get all of the cities within a single ZIP
code, as a list, or as a BNA file to plot?
A: You can use the Boundaries|Filter by Polygon program,
using a .BNA file of the ZIP code as a filter for the input file(s)
of cities.
Create Filter File - All ZIP Codes
First, you need to make a .BNA file that contains only the
single ZIP code you want to use. The easiest way to do this is
with the Boundaries|Write Separate Files program. This program
will create individual .BNA files for each object (e.g., ZIP
code). If you need a large number of individual ZIP code files
from a particular state, this is probably the best option. If
you only need a few individual ZIP code files, you should use
the other approach described below under "Create Filter
File - Selected ZIP Code."
From the TAP menu, click on Boundaries, then select the Write
Separate Files option:
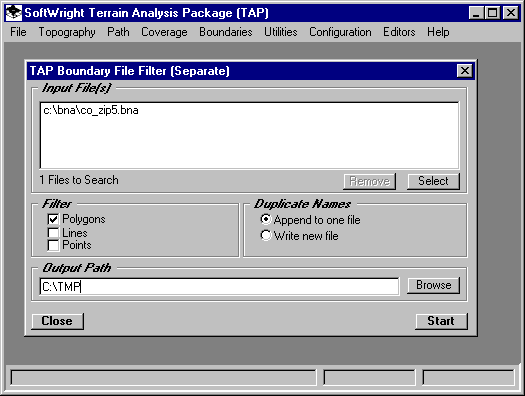
This program allows you to read .BNA file(s) which typically
contain multiple objects (such as all the ZIP codes in a state),
and to write each object to its own .BNA file. The file names
will be based on the name of the object in the file, such as
80012.BNA, 80015.BNA for ZIP codes. You can then use the individual
file for a ZIP code. (Since the program will write a .BNA file
for each ZIP code in the file, you may want to delete
the unneeded .BNA files after the program is completed.)
In the Input Files section, click on the Select button to
find the .BNA file that includes the ZIP code you want (usually
the state ZIP code file, such as CO_ZIP5.BNA).
In the Filter section, click on the check box for Polygon,
since ZIP codes are closed boundaries (polygons). Other .BNA
files may contain other types of objects, such as roads or rivers
(Lines) or tower locations (Points).
In the Duplicate Names section, click on Append to one file.
(In some .BNA files, some polygons may have multiple parts, such
as two parts of a county that are not connected. This option
will write all objects with the same name to the same file. The
other option will write each duplicate name object to separate
files, such as DENVER01.BNA, DENVER02.BNA, etc.)
In the Output File section, enter the output path where you
want all of the new .BNA files to be written. You can click on
the Browse button to find the directory you want.
Click Start to create the new .BNA files.
Click Close to close the form.
Now that the .BNA file has been created with the ZIP code
for a filter, you can use the file in the polygon filter process.
Create Filter File - Selected ZIP
Code
If you only need one individual ZIP code file (or just a few)
you can use a different approach to create the filter file. The
Boundaries|Filter by Name program allows you to select individual
objects from a .BNA file and write them to a new .BNA file. (If
you need a large number of individual files (such as all the
ZIP codes in a state, you should use the "Create Filter
File - All ZIP Codes" approach described above to create
the filter file.
From the TAP menu, click on Boundaries, then select the Filter
by Name option:
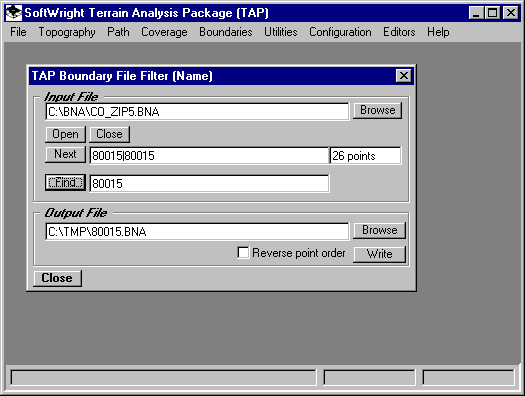
In the Input Files section, click on the Select button to
find the .BNA file that includes the ZIP code you want (usually
the state ZIP code file, such as CO_ZIP5.BNA).
Click the Open button to open the file and display the description
of the first object in the file.
You can click the Next button to scroll through the file one
object at a time, or you can enter a name of a particular object
(such as a ZIP code) and click the Find button to search the
file to find the specified object. (In other types of input files,
you could enter other kinds of text to find an object, such as
a city name if the input file is contains cities, etc.
In the Output File section, enter the output path where you
want all of the new .BNA files to be written. You can click on
the Browse button to find the directory you want.
When the object you want from the Input file is displayed,
click on the Write button to add the object to the new .BNA file.
You can add several objects to the same file, or you can specify
a new output file name for each object before clicking the Write
button.
If you want to search a different input file, click the close
button in the Input File section, click the Browse button to
find the new file, then click the Open button. Objects from different
input files can be written to the same output file if you want.
The Close button in the Input File section can also be used if
you want to close and re-open the file to start again at the
beginning of the file. (The Find function starts from the current
object to the end of the file. To start a new search from the
beginning of the file you would need to close and re-open the
file.)
Click Close (at the lower left of the form) to close the form.
Now that the .BNA file has been created with the ZIP code
for a filter, you can use the file in the polygon filter process.
Filter City File
Next you can use the new .BNA file as a polygon filter, and
one or more .BNA files containing the cities as the input files.
(You could use this same process with other types of .BNA input
files, such as roads, transmitter towers, etc.) From the TAP
menu, click on Boundaries, then select the Filter by Polygon
option.
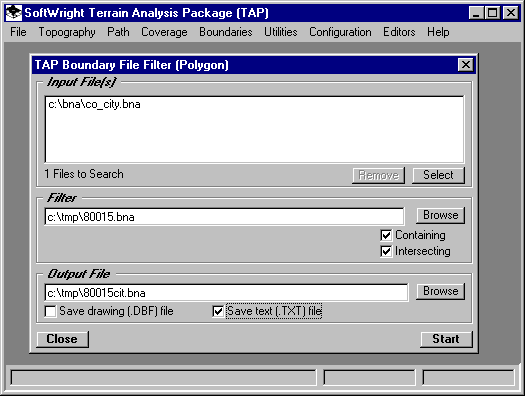
In the Input Files section, click on the Select button to
find the .BNA file that includes the cities you want. This can
be the state city file that contains the reference point locations
for cities (such as CO_CITY.BNA) if you just want a single point
approximate location for each city. If you have the state Place
files installed on your system (containing "places"
defined by the U.S. census) you can use the state file (such
as CO_PLACE.BNA) to use the actual outline of the cities. If
you only want a list of the cities, either file can be used.
In the Filter section, enter the name of the new .BNA file
of the ZIP code you want to use. Check the Containing and Intersecting
check boxes to include cities that either are completely contained
within the ZIP code boundary or are intersected by it. If you
only want cities that are completely inside the ZIP code (not
partly inside), check only the Containing box.
In the Output File section, enter the name of the new .BNA
file you want to write, containing the cities in the ZIP code
boundary. You can click on the Browse button to find the directory
you want.
If you want to create a .TXT file with the names of the objects
(ZIP codes), click the Save text file checkbox. The text file
will be in the same directory and have the same name as the .BNA
file you specified, but with the .TXT file extent.
The polygon selection process uses the Map Window. If you
want to save the Map Drawing data base file, check the Save drawing
file checkbox. The drawing file will be in the same directory
and have the same name as the .BNA file you specified, but with
the .DBF file extent.
Click Start to create the new .BNA file. This file will have
the cities in the ZIP code you specified.
Copyright 1999 by SoftWright LLC